Since it’s the holiday season and many parents are looking to find gifts for their children, I thought today would be perfect to share a quick tutorial on adapting simple battery-powered toys. Roll up your sleeves, grab your toy catalog and tools, and let’s get started!
Select a battery-operated toy
Select a battery-operated toy
Before we start, you need to pay attention to differences in the way battery-powered toys operate. Some have simple circuits…a basic exterior on/off switch…that can easily be interrupted. These are what we are going to talk about here.
Some sample toys that work well:
 |
| The dog walks and barks when the child presses the switch. Pressing a switch causes bubbles to stream out of the wheel. |
 |
| Drop beads in the center container, press the switch, and the threader automatically strings beads onto string or elastic thread. A fun way for your child to make jewelry for herself or for gifts! |
 |
| Make fun and easy art with a paint spinner! |
Other toys have fancy internal switches that are activated by pressure, often located in the hands, feet, ears, tummy. This last category is much more complex to adapt, so I’m not going to dig into that one today (but I will give you links at the end if you feel especially crafty!).
Round up a switch
Round up a switch
 You’ll also need a switch. A simple switch, such as a Jelly Bean, will activate the toy as long as it is pressed. Most single message output switches can also be used in this same way if you attach a speaker cable to it. How fun is it to call your puppy (“Here, puppy puppy!") and have him walk to you!
Buy or make a battery interrupter
In addition to a simple switch toy and a switch to activate it, you’ll need a battery interrupter. These can be purchased for about $13 US from Ablenet, Enabling Devices , EnableMart and other sources.
You can also make your own; see:
http://www.ataccess.org/pdf/Adaptingtoy.pdf (sturdy, uses a copper wafer)
http://www.deafblindresources.org/devices/batteryinterrupter.pdf (perhaps a bit more delicate, uses a plastic disk and tin foil)
Other tools (you probably already own)
Other than that, you just need a notching file and perhaps a screwdriver to remove the battery door.
Other than that, you just need a notching file and perhaps a screwdriver to remove the battery door.
 |
| Clockwise: screwdrivers, utility knife and files, battery interrupters |
You're ready to adapt your toy
Slide the copper plate (or foil disk) between the negative end of one of the batteries and the spring contact.
Slide the copper plate (or foil disk) between the negative end of one of the batteries and the spring contact.
 |
| The red arrow points to the plate inserted at the negative end of the battery |
 |
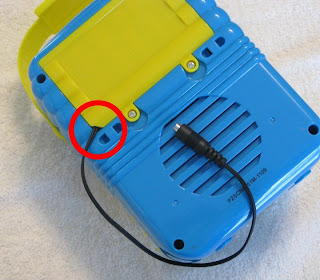
| Notice the notch at the lower left. It is just large enough to allow the battery interrupter cord to move freely, without being pinched in the battery door. |
Now, plug the male end of the switch wire into the female jack of the battery interrupter, turn the toy on (it shouldn’t be doing anything at this point!) and it’s time to play! When your child presses the switch, the toy should activate.
Playing with your child
Playing with your child
One comment on directing your child to “hit the switch…” Avoid that phrase at all costs! Instead, focus on the result of hitting the switch. “Make it go!” or “Blow me some bubbles!” are much more conversational and real-world and just a lot more fun. Sorry, I couldn’t help myself.
That was easy, now, wasn't it? I'll admit, with the advance of fancy internal switches, it's gotten harder to find simple toys to adapt. But they do exist if you shop around. Have fun!
* * * * * * * * * * * *
As promised, here are links to instructions for hardwiring complex switch-activated toys:
* * * * * * * * * * * *
You might also be interested in:
Building Communication through Play
Playtime Communication Book and GIVEAWAY!
You might also be interested in:
Building Communication through Play
Playtime Communication Book and GIVEAWAY!


3 comments:
Back in the day I learned to make my own switches, even. I was more than grateful for the expanded availability of adapted switches.
Your suggestions for what to say to a child are very important and helpful! Barbara
wow! very nice post. most are informative. this is just awesome, Very well written ! Thanks for taking us there ...with your words ! Thank you very much.
Can you please tell me where you got the automatic beader
Post a Comment